
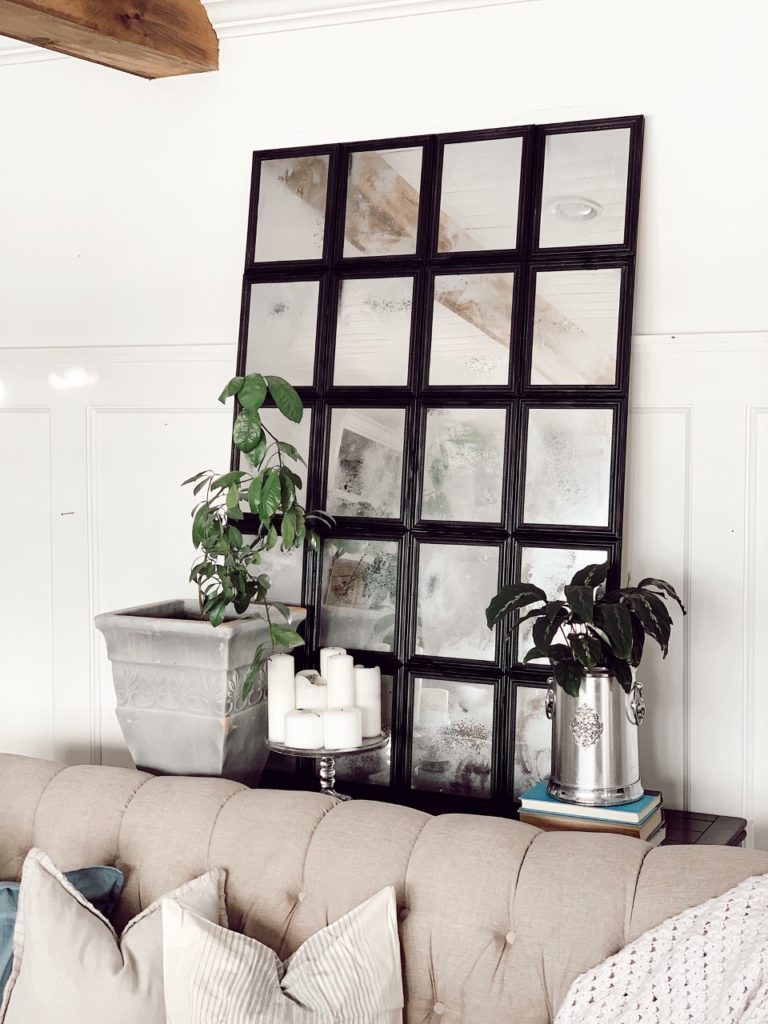
I’ve always wanted to own a panelled antique mirror.
For years I have seen these gorgeous grid mirrors in Pottery Barn magazines and on different websites and every time I want to shout from the rooftops, “ I LOVE them.”
But sadly my pocketbook keeps telling me “NO NO NO”. After all, these beauties can range from $700-$1k!!!
After researching tutorials for similar mirror hacks, I was left even more overwhelmed and doubtful about making my dreams of a mirrored panel window come true.
So, after hyping myself up, and about $30 dollars later, I finally resorted to trying my hand at my OWN version of a DIY panelled antique mirror.
Honestly, I was a little hesitant to take on such a big project. I mean, how could dollar store items look nearly as good as Pottery Barn?? But after being inspired by some of my fellow DIY fanatics who did their own version of this mirror hack, I just went for it!

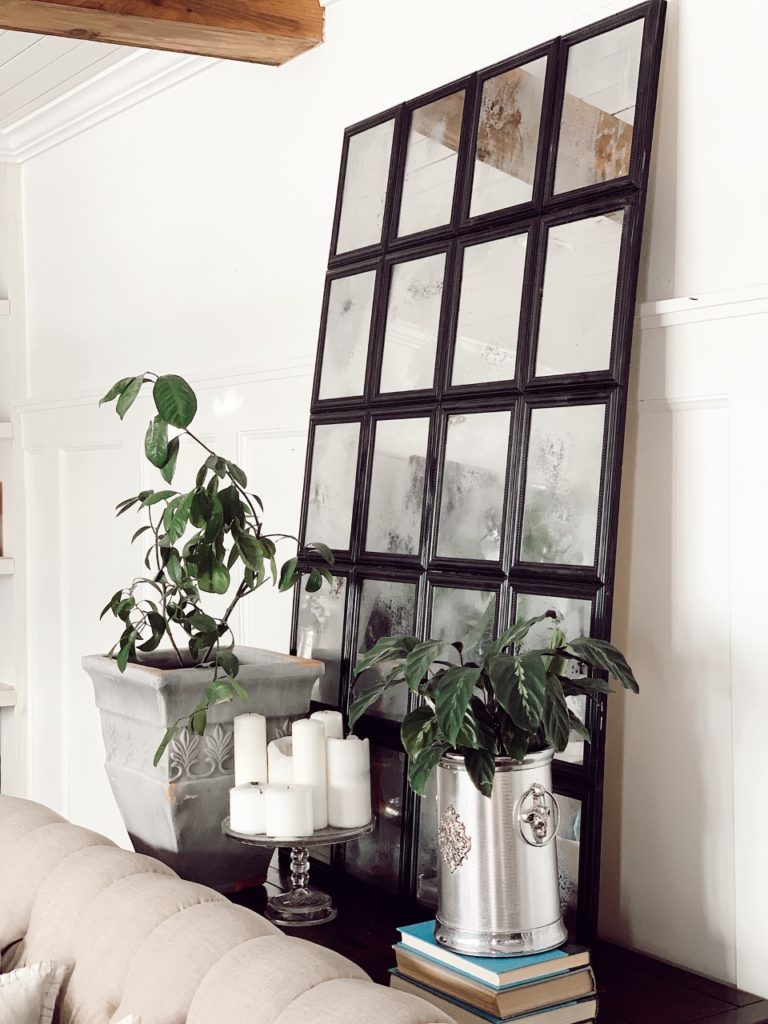
I’m happy to report to you that I’m currently sitting on my sofa, a few feet away from the new BEAUTIFUL mirror, and I can’t take my eyes off of it. If you have ever wanted to add some drama to your space, this DIY is meant for you.

My main worry about this DIY in particular was making some thing that was too flimsy that wouldn’t be able to stand the test of time. (Note: I don’t like wasting money and precious DIY time.) But I’m so happy to say that this mirror idea was able to be made and put together in an afternoon and offers some old world charm to my living room. I’m also happy to report that it is sturdy and heavy due to the base I chose to make it with. Yahhhhhh!
So without further ado, here is what you will need to replicate this mirror:
A bottle of heavy duty glue like “no more nails”
$20 Dollar Store framed mirrors
One can of black spray paint for your frame
A piece of plywood cut to fit your mirrors
A can of antique pewter spray paint
A can of chrome spray paint
And an optional can of black spray paint
An empty spray bottle
Equal parts water and white vinegar
Old rag
Now I really did try every which way to make this mirror. I shared my shortcomings and failures in my story on Instagram, if you’re into the whole BTS stuff.
Ultimately I decided to DIY this way because I wanted to share with you what NOT to do, what isn’t needed, and how you can save time (and money!) when you’re doing this project at home.
I also wanted to DIY this way because I read way too many tutorials on how to antique glass and all of the suggestions seemed to be complicated. Truth be told I’m a lazy DIYer.
So if you want the easiest way to antique mirror, here’s what I did.
First you’re going to take apart your mirror from your frames and you’re going to spray paint your frames whatever colour you would like yours to be. I spray-painted mine in a satin black for more contrasting look against my white walls, but I do think a metallic tone would be absolutely beautiful.
Next up you’re going to antique your mirrors.
I would do this step in a well ventilated area wearing a protective mask and protective gloves if possible. A drop cloth would be great to use too.
First you’re going to put equal parts water and vinegar into an empty spray bottle. Then you are going to ensure your spray bottle is turned to mist. You definitely want your spray bottle to be on “mist” because you are going to spray the vinegar and water mixture onto your mirrors and wherever those droplets land, your spray paint won’t adhere properly, ensuring a beautiful antique finish.
Once you’ve given one light spritz of your vinegar and water onto the front of your mirrors, you are going to lightly mist on your pewter spray paint and immediately mist on a little bit of your chrome spray paint.
Now you wait about 10 seconds and then you’ll take your rag and blot off any excess spray paint. Immediately the mirrors will start to get the look of antiqued glass with a haze being left on top of the mirror once you blot them.
For an added effect you can also add on a spritz of black spray paint which ends up looking like those telltale antique marks you will have noticed old vintage mirrors. (My only feedback on using the black spray paint is to use a very light hand when spraying, and keep the black spray paint to a minimum as to not overwhelm your mirrors completely.)
Now you have finished the hard part! The next thing you’re going to do is you’re going to lay down a piece of plywood that is cut to the exact width and length of your frames.
Now, don’t get scared off by this step. I simply went to my local hardware store knowing I wanted a very inexpensive type of plywood,I located the inexpensive plywood in the lumber department, found an employee at the hardware store, and politely asked them if they could cut my board to the length that I had previously measured out. They were happy to do so. When all was said and done the whole process took approximately two minutes. after that, I headed home with my piece of plywood and two other leftover cuts that I can use for additional projects.
Well at the hardware store I picked up a product that is very new to me that I’ve never tried before. It is a construction adhesive that adheres almost immediately with a tough grip. It is called “no more nails”, and it worked beautifully. There were other types of glue that I could have purchased to use inside of a caulking gun but I wanted to make this DIY so simple that you could do it at home with absolutely no DIY experience or power tools etc. So, I opted for the LePage construction adhesive because it already has a handy tip with an on and off switch for easy usage. This product claims to “instantly grab an adhere“, but do not worry, it isn’t like a instant superglue where your fingers can get glued together without you even trying. I was able to use this glue on a mirror, lift up a crooked mirror and relocate it in about five seconds time, without damaging the mirror. This glue does infact adhere very fast, but it does give you that little bit of time and wiggle room that you might need to get your mirrors nice and straight.
I will say I was so impressed that I could pick up my mirror off of my dining room table and place it where it currently is resting in less than 10 minutes of putting on my last mirror for this project.

Attaching the mirrors with the glue to the plywood is absolutely simple. I simply dabbed some of the glue around the exterior of the frames in all of the corners. I even spread it around with my finger to make sure there was a little bit of glue all the way around each frame!
Then I placed it down on to the plywood and pressed it gently in the corners so it could stick. I would suggest applying the mirrors one at a time in a row across your sheet of plywood. This will give you enough time to wiggle around your mirrors and make them nice and even before starting the next row.
Once all your mirrors are on to your plywood they should be sticking pretty well. You will immediately noticed that you can see the bit of the plywood around your frame when you look at it from the side. This is an easy fix. I simply added on some black spray paint to this area. If you are feeling like your hand isn’t that steady, go ahead and pull out some black paint and a paintbrush and make that plywood visually disappear.
Wait for everything to dry, and then place your mirror somewhere where you can admire it for years to come.
I’m already wondering when I can build another one for a different area of my home.
This project was so simple to do that I can’t believe it took me years to work up the guts to do it.

The outcome of this DIY antiqued mirror window was better than I had hoped. I love how it adds height interest and an interesting story to our living space now.
If you get up to making our version of a DIY pannelled antique mirror window, I’d love for you to tag us on your social channels and let us know if you changed anything to make this DIY your own, and how you’re enjoying your new mirror.
To see the behind the scenes of our DIY’s feel free to follow our adventures over @Bethanythislittleestate and if you have any questions about our DIY’s please send me an email, or drop me a line at thislittleestate@hotmail.ca

I look forward to connecting with you over your own DIY’s!


Marijean
February 27, 2020 at 1:33 pmOne of the best projects I have seen in a long time!