
A few weeks ago we were taking all things family room.
You can get caught up by reading:
I shared our love for late night projects and for clean and crisp moulding.

Last time we talked, we were neck deep with the addition of panelling our entire family room with the addition of board and batten, and I’m pretty sure, you and I both knew, there would be a lot of work in front of us!
Since sharing our big plans, many of you asked the specifics of our idea and inquired on cost and basically all the nitty gritty details all savvy DIY-ers would want to know to make your own board and batten panelled wall.
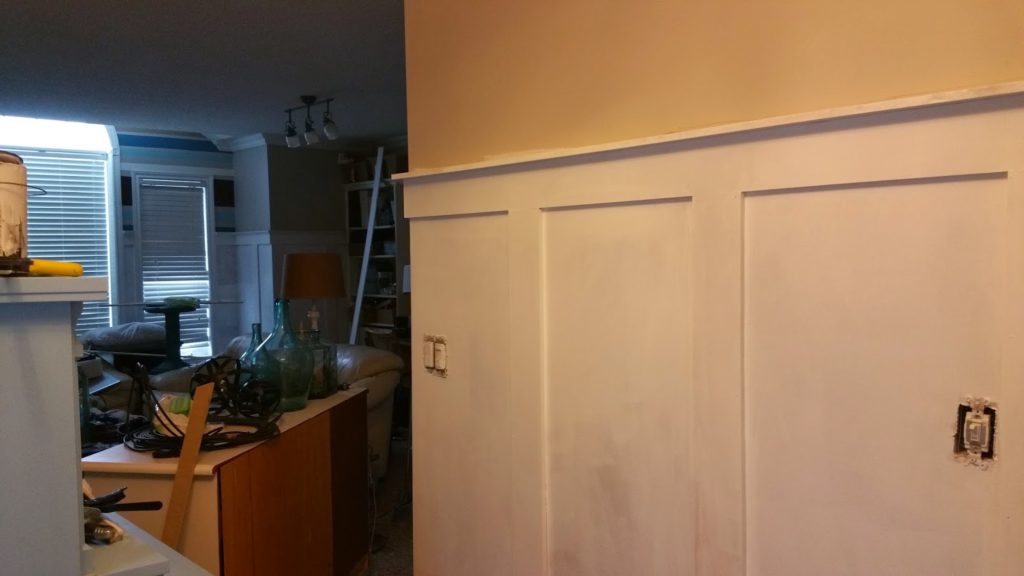
So, please forgive the dark pictures #Canadianwinterproblems but today I wanted to share with you the “how” before we move on and show you the “pretty”, otherwise known as the finished product.

HOW TO ADD BOARD AND BATTEN TO ANY SPACE
(BY DIY-ing a panelled wall)
- First go to your local hardware store and buy MDF boards and strip each 4 by 8 foot board into four inch wide pieces. (We got ours for $21 from Lowes) If you smile super sweetly they may just rip them for you too!
- Come home and paint your walls. This will save you so much time cutting into your panels with paint. You wont have any of your old paint peeking through if you follow this important step! We used Behre Paint from Home Depot in Bright White.
- Then remove your baseboards. We chose not to add ours back on, but that can always be an option for you if you want to layer your baseboards for a heartier look.
- Figure out what you would like your spacing to be like. We wanted our moulding to be as high as five feet 3 inches. So we took a level and drew a line across our wall.
- Then we added our top piece straight across the wall. We secured it in place with wood glue and then used our nail gun to secure it to the wall.
- Then we added strips perpendicular to the floor as we would with a baseboard. We glued and secured them into place just like we did with our top piece.
- Then we took our strips and spaced our pieces/panels 16 inches from end to end.
- Then to finish it off, we stripped a piece of MDF to be 1 3/4 inch wide and glued and nailed it width wise on top of our flush “top” piece.
- To completely finish it off, we used 3/4 inch moulding. Instead of having a convex curve though, it is concave in shape and is called “cove” moulding.
- Putty the seams. For a finished and professional look you will want to carefully putty the seams, nail holes and spaces on your wall. I used “Dap” for this and smoothed it into place with my finger and made a clean finish by using a wet cloth to remove any excess
- Paint over everything and anything until satisfied.
Now that all of that wordy-wordiness is out of the way.
Here is the tutorial for all you visual learners.

Take off baseboards.

Paint your walls.

Have fun with this part (ie: take lots of selfies, wear sweat pants, crack open a cold drink of your choice, play loud 90’s pop music and enlist some funny kids to cheer you on)… because this part is going to be long and tedious and you will want to quit. The sweat pants and Justin Timberlake tunes help. Trust me.

Put all your outlet covers in one place. If you cant find a screwdriver to take them off, use a kitchen fork like my Mama use to do.

Figure out your spacing. Hire good help if it is available to you.

Attach your panels to the wall with glue and a nail gun. Make sure you have a hairy supervisor overlooking the project to make sure everything runs smoothly.

Seal and putty any spaces and nail holes then paint over your wall and board and batten panelled wall.

Paint second coat and third coat and fourth coat of white paint but only throw the paint brush once.

Be prepared for this to be a weekend project not a nightly project.

Add top trim piece and freak out with happiness since it looks so darn good — even in the dark at midnight.

Add your concave moulding for a finished look.

Putty and fill a million nail holes and paint some more.

Take some fuzzy pictures due to delirium and pure excitement.
Putty and fill and paint some more.

Now, watch as your boring walls gets transformed into a room that looks full of character, interest and texture. Not to mention, you will be freaking out about how big and wide your room now look with its bright and white walls!
Swoon!

I hope that answered most of your questions and gives you an idea on how you can add moulding and trim work to your space. We are absolutely smitten with how this panelled board and batten treatment turned out and I cant wait to show you the whole room reveal.
If you add this to your honey-do-list this weekend send me an email or give me a tag so I can cheer you on during that whole painting part, k?
Happy weekend and happy DIY-ing friends!


Kerry
February 21, 2015 at 5:43 pmThank you so much for posting this! We have been trying to decide how to do paneling on the bottom half of the wall for the nursery! I showed your tutorial to my husband this morning and I think we'll be heading to Home Depot today to buy what we need! We don't have much time left before little man arrives so we need to get to work! 🙂 Thanks again for the inspiration!
bethanygier
February 23, 2015 at 4:18 pmHi Kerry! Thanks for visiting! I hope you are able to get started on the board and batten before baby comes! You must be in the FULL nesting stage! Cant wait to follow along and see hoe the room comes together! xo
The Moving Chapters {Chapter 23: Girls bedroom makeover} | This Little Estate
April 2, 2018 at 8:58 pm[…] and true tutorial that we used in our previous home and in a lot of our spaces in our new home. HOW TO INSTALL BOARD AND BATTEN With so many elements of texture going on this space, I wanted to keep the walls one colour from […]