Hi Friends! I hope this finds you enjoying your Thursday!!!
We have had kids doctors appointments today and now I am slowly working through the mountain of laundry that magically developed while we were all sick last week.
The bright side? I may or may not own a frilly black apron that I wear to complete these mundane tasks. I wear it around all Martha-Stewart-like and convince myself that my afternoon isn’t as boring as it is. Thank goodness for my creative imagination!! (And for window coverings.)
We have been slowly completing some projects around here too!
I wanted to pop in and let you in on some well loved painting tips that help to complete a furniture fix up with less mess and even less clean up! We could all use a few time savers (cause that mountain of laundry wont disappear on its own!)
This has saved my poor carpet so many times!
By elevating a piece of furniture you are then able to paint indoors! No more lugging that big armoir out to the garage. Just elevate with some similarly sized cans and you can get all the way down to the bottom of your furniture’s legs.
I used to use newspaper for this, but too many times the newspaper and the paint got stuck together and the paint job I took so long to perfect would be ruined! 🙁 Not good. Enter big ole cans and your painting projects will be so much easier and will reflect the time you spent perfecting it!
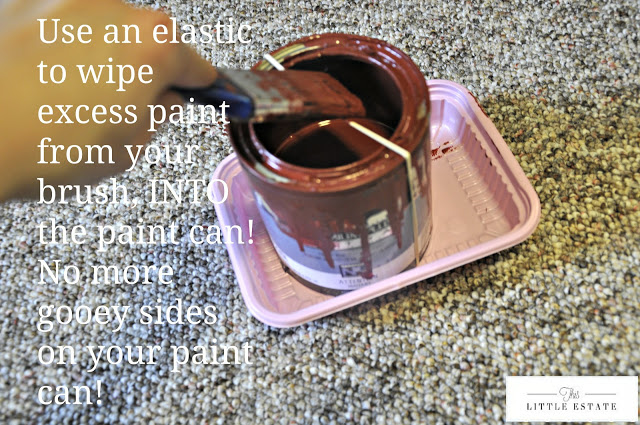
I have seen this tip all over Pinterest and haven’t been able to find its original source. But I have been doing this for years!! Before I had children and had the excess time to paint all afternoon (and not just during their freakishly short nap times), I would take a nice wet paper towel and scrub my paint can clean. Along with this elastic trick you couldnt tell if my paint cans were even used! Ha!
Now I just pray I don’t drop my paint can as I slap paint on a piece as fast as can be.
This elastic trick is so good, especially with small cans where you don’t have to pour the paint into a tray. If you are only using a paint brush and don’t need to use a roller this trick will keep your excess paint off of the sides of your can.
Your hands wont get drips of paint on them if you are holding your paint can and you wont have to work at getting the lid on and off the next time you use your can. A clean paint rim will mean a quicker and cleaner paint experience! (Note, this messy crusty pain can could have valued from this tip. It was happily rescued from our cities waste site, where old paint goes to be find a new home.)
My husband calls me a hoarder, I say I am a recycle. Whatever the case, I like to re purpose items that others may just see as garbage. This little pink tray use to hold sliced mushrooms from our grocery store. I simply washed it out and used it as a tray for my paint can. No more worries about rings of paint on the carpet!
This little tray is also the best place to rest my paint brush. Too many times I have rested one across the top of a paint can and have had it fall off and hit the floor or fall into the can. Both situations make for a bigger mess to clean up and is just so time consuming when you are trying to bust out a project in 30 solid minutes.
I hope you can try these quick and free painting tips. They have worked for me, and I am a self declared horrible painter.
I rush really fast try my best, and yet somehow end up with paint splattered everywhere. Bad Mama. Next time I should just wear that frilly apron, at least I would look cute doing it, even if the project is somewhat messy.
What tips do you have for me? I will take all the advice I can get. Anyone know how to get paint stains out of half of your wardrobe??


Patricia Reitz
November 16, 2012 at 1:15 amThese are great tips, especially the try under the paint can. Fabulous.
City Farmhouse
November 16, 2012 at 1:21 amGreat tips Bethany!! I am so glad you stopped by my blog:)! Your blog is so pretty, looking forward to sahring your journey, linking you up to my blog. Have a great night!
bethanygier
November 16, 2012 at 1:50 amThanks for stopping by Patricia! Hope the can idea helps you in the future! xo
bethanygier
November 16, 2012 at 1:52 amThanks for stopping by Jen! Im so happy you came to visit! I just went pin crazy from your Pinterest page! ;)Thanks!!
xo
Claire @ The Rustic Pig
November 16, 2012 at 3:39 amHey sweet girl!!! You've been nominated for Liebster Award!! http://www.therusticpig.com/2012/11/liebster-award-woo-hoo.html
bethanygier
November 17, 2012 at 3:56 amWow Clair! That is amazing!!! Thank you oh so much!!!! Cant wait to go check it all out!!!
xo
Anonymous
November 17, 2012 at 12:28 pmTerrific ideas!! Love how very simple things can make a world of easy difference. Have fun painting.jojo 🙂